Promotion: 12% off $75 Orders
Free US Shipping over $65 [Molds & Sheet Glass Not Included]
Good until Midnight Saturday

Accessories
Adhesives
Chemicals
Cutting Tools
Drilling
Glass Tools
Grinding
Kiln Supplies
Mica Lusters
Night Lights
Stained Glass Supplies
Scrap Glass
Confetti
Confetti Multi-Mix
Frit Coarse
Frit Opal
Frit Transparent
Glass Packs
Mixes
Millefiori
Murrini
Murrini-Geometric
Noodle-Stringer
Scrap Glass
Pebbles
Wafer Sheets
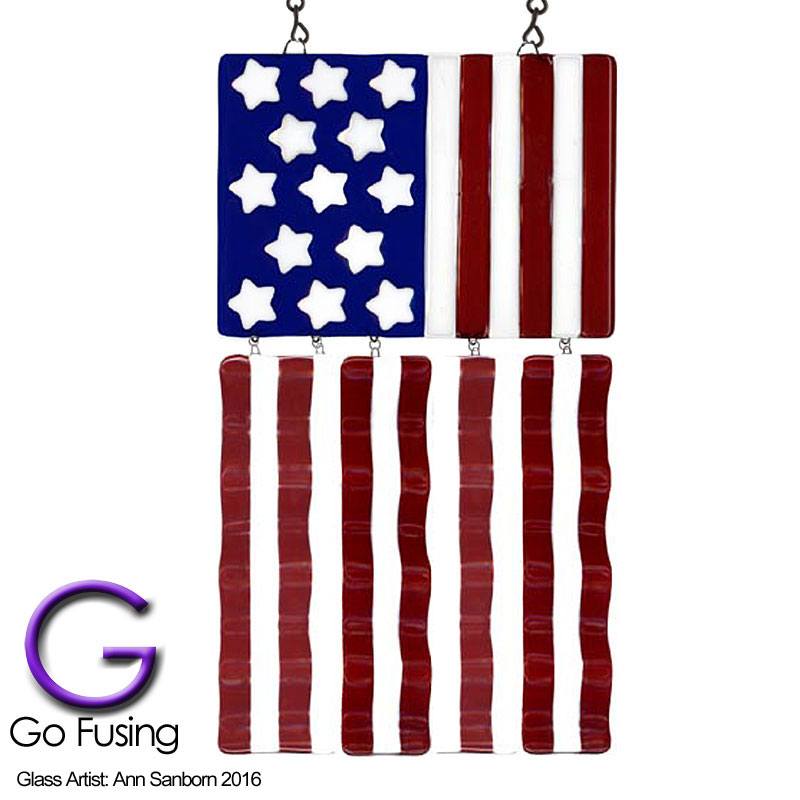
098 Project: Fused Glass American Flag Waving Wind Chime
098 Project: Fused Glass American Flag Waving Wind Chime
Skill Level: Easy
Educational Goals: Learn how to create a patriot US flag wind chime.
Materials List: Materials List for COE 90 or COE 96
Overall Project Dimensions: Approximately: 8 1/2 " W x 15 " L
SPECIAL NOTE: Proper handling of a hanging flag requires the star section of the flag to be positioned in the upper left. The very first official American flag has 13 stars, 7 Red Strips and 6 White Strips. The dimensions used in this project are to keep it fairly proportionate.
OPTIONS to substitute for needed glass: Use Clear Glass and apply Solid Enamel Color Decals Sheets and kiln fire to create the Red or Blue glass and/or cut out stars from the White Enamel. Then you can use all white or clear glass for the base project.
Kiln Project Material List:
- Qty 13 1 Inch Precut Glass Shape 3mm Stars or Wafer Stars
- Or a White Enamel Star Fused Glass Decal
- Or punch or cut out stars from a White Enamel Sheet Decal
Fusible Sheet Glass:
White Opaque, Red Transparent, and Cobalt Blue Transparent
Fusing Supplies:
- Glass Slumping Mold: Wind Chime Ripple #41253
- Fiber Paper 1/8 inch Thick 1 square foot #41502
- Bullseye Shelf Paper or Papyros Shelf Paper
- High Temp Wire 17 Gauge #41501
Miscellaneous Supplies:
- Chain Jack 16 Gauge (we used Silver 2 feet)
- Kiln Wash
- Elmer’s Glue
- Rubbing Alcohol, Dish Washing Liquid
- Cloth with very little lint for cleaning
Step 1 - Preparation
- Clean the precut glass shapes including the edges•
- Cut all High Temp Wire: 2 longer for the top of the flag and 10 shorter loops that will hand the wavy glass strips. Bend all wire, leaving straight ends on each side that will be fused between the 2 layers of glass
%20to%20shelf</li>%0A<li>Cut%20Shelf%20Paper%20to%20fit%20shelf%20or%20just%20the%202%20inch%20square%20to%20fit%20project%C2%A0</li>%0A<li>A%20US%20Flag%20will%20have%C2%A07%20Red%20Stripes%20&%206%20White%20Stripes:%20<br>-%20White%20Glass:%20Cut%20(6)%205/8) - Red Glass: Cut (7) 5/8" x 8 1/2" and Cut (3) 5/8" x 6 3/8" strips
- Red Glass: Cut (7) 5/8" x 8 1/2" and Cut (3) 5/8" x 6 3/8" strips
- Blue Glass: 4 5/8" x 6 3/8"
Step 2: Position Glass:
SPECIAL NOTES: We full fused the upper pieces on to one piece of clear glass. For the wind chimes you have to decide how many wind chimes you want by the number of stripes you fuse together on a piece of clear glass. We suggest that you always use a minimum of one red and white strip together for the smallest wind chime. Our project has one wind chime section of 4 stripes (hung directly under the stars) and 3 other wind chime sections of 3 stripes each.
Cut 1 piece of clear 8 1/2 inches wide by 6 3/8 inches long for the top portion. Using a small spec of Elmer's glue on the outer edges of the blue glass square position it to the far upper/left on the clear glass. Then start with a white and then a red strip until there are 3 white and end with a red strips of glass. Finally, position each of the 13 white stars on the blue glass and let dry.
After you are sure the glue has dried, if you want stars to show on the back, flip the piece over and position 13 more stars exactly over the ones on the front side.
Slide you largest 2 pieces of wire loop you made between the colored glass and the clear glass. We suggest that you do not put them to close the ends of the total width for better strength. (See back side below.)
Then position each of the smaller pieces of wire loops to hold the stripes that will become the rippled wind chimes. Step 2: Put together the longer stripes (to become your rippled wind chimes): Cut your strips of clear glass to the size you want for each combined stripe and using small specs of Elmer's glue on the outer edges and insert the wire loops at the top end trying to line up with the loops hanging from the top section and matching up the stripes.
Here is an example of what you are trying to attain after fusing. Ready to wire together!

| SMALL PROJECT SLUMP FUSE 2 LAYERS | ||||
| Process | Temp/Min | Desired Temp | Soak Temp | Action |
| Increase/Temp | 12°F/ 7°C | 1,000°F / 538°C | 1 Min. | Remove Vent |
| Increase/Temp | Full Speed | 1,310°F / 715°C | 20 Min. | Observe |
| Hold/Temp | 5°F/ 3°C | 955°F / 513°C | 30 min. | Hold Fire |
| Decrease/Temp | 3°F/ 2°C | 750°F / 400°C | 30 min. | DO NOT LOOK |
| Cool/Temp | Do Nothing | 100°F / 38°C | N/A | Time to LOOK! |
How to convert Cone to Fahrenheit Temperatures How to Glass Fusing Kiln Firing Schedules
Step 4 – Optional Add Ripples to flag Either use the 1/8 think Kiln Fiber, rolled or place on the Prepared Ripple mold and place the separate flag strips on them in the kiln and repeat the slump fused schedule.
Step 5 – Attach Fused Glass Flag Chimes & Hanging Chain: Using a pair of pliers use at least one link of the chain to attach to the top wire loops of the flag. Then attach each of the flag strips together with the matching wire loop on the upper part of the flag by twisting a piece of wire.
Go Fusing today and Enjoy!
- Choosing a selection results in a full page refresh.
Newsletter
Quick links
Our mission
Promote the Future of Custom Art Glass by providing inspiration thru sharing creativity and knowledge.
Contact Us
Follow us
!